Learning Outcomes
By the end of this tutorial you will be able to:
- Set up variables.
- Listen for when variables change.
- Update your UI based on variable changes.
Monitoring Variables
Project Mammut contains a Variable Store that holds all the variables in your game at runtime.
These variables can be almost anything:
- Time of day.
- The amount of money the player has.
- The player's name.
- The player's pronouns.
- The player's inventory.
- Their progress in the game.
These variables can be set with a default value in the Variables Manager and updated either within a chapter (when a user reads a certain paragraph node) or within the game code.
You may want things in your game to happen when these variables change. To facilitate this, you have the ability to listen for changes to these variables and then perform an action based on what changed.
Add the Variable
In your project, open the Variables Manager in the top-right corner of the editor.

Click on the + Add Variable button and add the variable you want to monitor. Set a default value, then click Add Variable to save the variable.
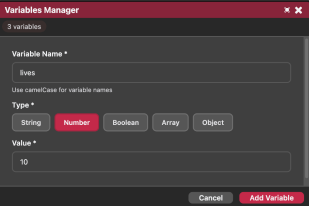
You should now see your variable listed.

Add as many other variables as you need using the same process.
Create the UI
In your game, you will most likely have UI elements that you want to use within different scenes.
The best way to manage this is to create a UI Scene that you use as a sub-scene in all your other scenes.
That way, when you want to make changes to your UI, you only need to update this UI Scene and all other scenes that use it will also update.
In your assets → sub scenes folder:

Create a new scene called:
UI
In this scene, we are just going to put two text objects:
- One as a title.
- The other to show the value.
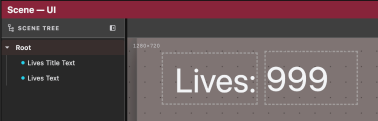
Note
When laying out UI elements like this, it is best to use the largest number possible a value could hold so you know there is enough space for that value in the UI layout.
Any time you want your code to interact with an object in your scene, you need to give it an ID.
Select your Lives Text object, click on the ID button, and give it the ID:
lives_text
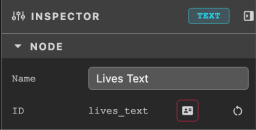
Click on the Code button to access the scene's code.

We are going to add a single line to check that everything is set up correctly.
// Called when scene is ready
onStart(){
  this.dom.lives_text.textContent = Store.Get("lives");
},
This is placed in the onStart function because we want this to run when this scene is loaded.
Here is a basic rundown of what each part of the code does:
| Code | Description |
|---|---|
this |
Refers to this scene. |
dom |
Refers to the "Document Object Model". This is the list of objects in the scene that we have given IDs to. |
lives_text |
This is the ID of the text object we created to display the lives value. |
textContent |
This is a property of a text object that controls what text it displays. |
Store |
This is the area that holds all the variables in the game engine. |
Get("lives") |
Fetches the value of the variable called lives. |
Preview the Scene
To test your scene use the Play Preview button:

If done correctly, you should see the UI show the correct value when the project loads.

Debugging
If something is not working, you can check the console while the project is running by pressing F12 to bring up the developer tools.
For more information see the Debugging page
Listening for Variable Changes
In this example, we need to update the UI at two different times.
First, when the UI scene loads.
Second, whenever the
livesvariable changes its value.
To ensure that we are not repeating code, we create a new function called onLivesUpdated and call it from onStart.
// Called when scene is ready
onStart(){
  this.onLivesUpdated(Store.Get("lives"));
},

onLivesUpdated(newValue: number){
  // Update the lives UI
  this.dom.lives_text.textContent = String(newValue);
},
The : number after newValue tells TypeScript that the value is a number. textContent only accepts text, so String(newValue) turns the number into text first.
This should work exactly like before.
Next, we register this function with the Store. This will make the function run every time the variable changes.
// Called when scene is ready
onStart(){
  this.onLivesUpdated(Store.Get("lives"));
  Store.Register("lives",this.onLivesUpdated,this);
},
Why pass this at the end?
We are telling the Store to run this function at a later time, but the Store is unaware of what it is actually calling. It just calls this function blindly.
Because of that, the function does not know what this is referring to.
The this at the end of Register tells the Store which scene the function belongs to. The Store then:
- Calls the function with
thislinked back to the scene, sothis.dom.lives_textworks. - Stops calling it automatically when the scene exits.
Testing Variable Updates
We need to test that everything is set up correctly.
To do this, we can change the value of lives using:
Store.Set("lives",11);

When run now, we should be able to see the correct value shown.

So in summary:
- We set up a function that changes the value of the UI.
- We told the Store to run that function when a certain variable changes.
- We then told the Store to change that variable.
Unregistering from the Store
Because we passed this when registering, the Store stops calling the function automatically when the scene exits, so there's nothing to clean up in onExit.
If you ever want to stop listening while the scene is still open, call:
Store.Unregister("lives",this.onLivesUpdated);
That's it.
Every time the lives variable changes, your UI will also change.
You can also change the lives variable from within your chapters.
Full Code
The complete scene code should look like this:
// Called when scene is ready
onStart(){
  this.onLivesUpdated(Store.Get("lives"));
  Store.Register("lives",this.onLivesUpdated,this);
},

// Updates the lives UI
onLivesUpdated(newValue: number){
  this.dom.lives_text.textContent = String(newValue);
},
Creating a Clock
We can use the same pattern to create a clock and calendar in the UI.
The clock will update automatically whenever the time or date variables change.
Adding the Font
To add your own font see the Font Manager page.
Creating the Clock UI
In your UI sub scene, create a container containing all the text elements needed for the clock.
Apply your custom font to the text elements.

Ensure all the text elements have IDs so that we can edit them through the script.

Adding the Variables
In the Variable Manager, add three variables to track the time and date:

Note
currentTimeis the number of minutes from midnight.For example:
600 = 10:00 AM
currentMonthis the month number, from 1 for January to 12 for December.
Clock Scene Code
Below is all the scene code needed to make the clock work.
// Called when scene is ready
onStart(){
  // Listen for when "currentTime", "currentDay", or "currentMonth" changes, and when it does, call onCurrentTimeChanged or updateDate
  Store.Register("currentTime",this.onCurrentTimeChanged,this);
  Store.Register("currentDay",this.updateDate,this);
  Store.Register("currentMonth",this.updateDate,this);

  // Initial call to update the UI to the current store
  this.updateTime(Store.Get("currentTime"));
  this.updateDate();

  // Test to ensure that the update works
  Store.Set("currentTime",500);
  Store.Set("currentDay",16);
  Store.Set("currentMonth",1);
},


// Called when currentTime changes
onCurrentTimeChanged(newValue: number, oldValue: number){
  this.updateTime(newValue);
},


// Updates the time UI
updateTime(newValue: number){

  // Convert value to a hour and min variables
  let hour = Math.floor(newValue / 60);
  const minute = Math.floor(newValue - (hour * 60));

  // If you are using a 24 hour clock, then you don’t need the two next if statements.

  // Change AM/PM
  if(hour >= 12){
    this.dom.am_pm_text.textContent = "PM";
  }else{
    this.dom.am_pm_text.textContent = "AM";
  }

  // If the clock is 12 hour then adjust the time, showing midnight as 12 rather than 0
  if(hour > 12){
    hour = hour - 12;
  }else if(hour == 0){
    hour = 12;
  }

  // Update the clock_text dom with the new values
  this.dom.clock_text.textContent = hour + ":" + String(minute).padStart(2,"0");
},


// Called when currentDay or currentMonth changes to update the date UI
updateDate(){

  // An array of strings to lookup what month to show
  const monthName = ["JAN","FEB","MAR","APR","MAY","JUN","JUL","AUG","SEP","OCT","NOV","DEC"];

  // Get Month and Day
  const currentMonth = Store.Get("currentMonth");
  const currentDay = Store.Get("currentDay");

  // Work out what suffix to use on the day based on the day number: 1st, 2nd, 3rd, 4th ... 11th, 12th, 13th ... 21st
  // % gives the remainder after dividing, so 21 % 10 is 1
  let suffix = "th";

  if (currentDay % 10 == 1 && currentDay != 11){
    suffix = "st";
  }else if (currentDay % 10 == 2 && currentDay != 12){
    suffix = "nd";
  }else if(currentDay % 10 == 3 && currentDay != 13){
    suffix = "rd";
  }

  // Update the date_text dom with the new values
  // Months are numbered 1 to 12, but the list starts at 0, so take 1 away
  this.dom.date_text.textContent = currentDay + suffix + " " + monthName[currentMonth - 1];

},
How It Works
The clock follows the same pattern as the lives example:
- The UI registers functions with the Variable Store.
- The Store calls those functions whenever the related variable changes.
- The functions update the text objects in the UI.
The time is stored as the number of minutes since midnight, which makes it easy to update and compare in your game logic.
For example:
Store.Set("currentTime",600);
would set the clock to: 10:00 AM
Final Notes
Using this approach, you can create UI elements that respond automatically to your game state.
The same pattern can be used for:
- Player statistics.
- Inventory counters.
- Quest progress.
- Currency displays.
- Character information.
- Any other value stored in the Variable Store.
Once your UI is connected to variables, your chapters and game code can update the game state, and the UI will update automatically.