When making art for your game it's important to plan several aspects around the art in your game before you get started.
Making games in Project Mammut (or any game engine) it's always good to follow good project Hygiene, this makes less work for everyone in the team later down the line (even you are the entire team).
When a good art pipeline is set up and followed then you will save a lot of time, frustration, effort, and potentially money.
What's the problem we are solving here?
When an artist doesn't have a set of guidelines to follow then it can lead to them guessing how art should be made which leads to work fixing and potentially a larger build size or a worse experience for the player.
For example:
- If a 2D game's assets are made too small, they will need to be rescaled up in the game to their required size and it will not look as higher quality.
- On the other end if they are too big, then it will need to be scaled down and causing the player to load larger images into memory than required and the game's build size will be larger than it needs to be.
The Reference Resolution
Before starting development on any game, you should always know what the ideal resolution that your game should be played in.
Have a look at the Steam Survey and you will see that about half of players worldwide use a 1920 X 1080 as their display resolution, and this has been the case for many many years.
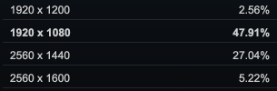 September 2026 Steam Survey Screen Resolutions
Mammut Default Reference Resolution is 1280 x 720, as this is a set as it's a good resolution for smaller games while still keeping a high level of quality. But you may want to change down if you are using pixel art, or up if you are wanting an even higher level of quality, or even have a portrait aspect ratio if you are intending the game to run vertical on mobiles.
Note: a Reference Resolution is NOT the resolution the game will run at. Rather, think of this setting as the "design size", i.e. the size of the area that you work with in the editor. If the user makes the window smaller, everything will scale down, and vice versa for windows larger than the reference resolution.
Project Mammut has the ability to set your Reference Resolution in your Project Settings under the Display settings.

Your artist workspace
In the application you are using to draw or layout your art you should set your canvas to be the same size as your Reference Resolution (or double it's size (see below)).
Then when making your art, use this cavas to size everything so that it is correct before even you put it into the game engine.
Fore example:
- All your backgrounds should be exactly the same size as your Reference Resolution
- A character that takes up 1/3 of the screen height, should be 1/3 of the Reference Resolution's height.
If done correctly then you can just drop the images into Mammut and they will automatically be the correct size.
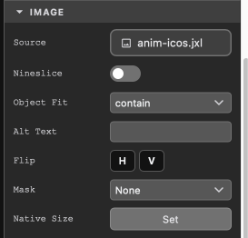
When you add an image to a scene image node you will see in the Inspector there is a Native Size Button, this will set the node the the same size as the image to ensure that it's exactly the size the artist intended.
Make it big, export it right
When making your images, inside your art program, work on a canvas at twice the size of your chosen reference resolution, then export a copy at the engine size. You keep a high-quality master in case art needs resizing later, or for a future HD version of the game, while the project only gets the smaller file it needs.
Keep your layered working files (Photoshop, Krita, Procreate and so on) outside the project's assets folder. The project only needs the exported images.
There are several ways to resize your images. One useful way is to use OS level Batch-resizing tools make the export step quick:
Here are a few options that work well
- Windows: PowerToys Image Resizer
- Mac: Quick Actions for resizing
- Linux: Image Magick
Where art goes in a project
All project files live in the assets folder, which you manage in the File Browser. You can drag files from your computer straight into it. A few conventions keep things tidy:
assets/images/: backgrounds and general scene art (make sub folders to keep things cleaner).
assets/characters/
File formats
- WebP and AVIF: usually smaller than PNG or JPEG at similar quality, and both support transparency.
- JPX: A newer and very well compressed format. Works very well, except Webkit does not yet support JPX animations.
- PNG: the safe default. Supports transparency and keeps edges crisp, so it's best for characters, UI, logos, and anything with see-through areas.
- JPEG: smaller files with no transparency. Good for painted or photographic backgrounds that fill the whole screen.
- SVG: vector images that stay sharp at any size.
- BMP: works, but the files are very large, so export to one of the formats above instead.